Setting up Worldgroup
Note: These instructions were made using a 64-bit windows 7 sp1 PC with UAC turned off. YMMV on different OS's.
Install
Install Worldgroup 3.30 using setup.exe. - wg330.zip
NOTE: After you run setup you will see a progress bar and then it may/will go away and appear that nothing is happening. Just be patient, it could take a minute or two, but eventually another screen will come up.
NOTE 2: Some people have had issues installing it from extended paths. Try extracting it to the root of the C drive to something like
c:\wginstalland installing it from there.
NOTE 3: Another possible fix if the setup fails to progress: Open task manager -> details tab -> right click setup.exe -> choose "analyze wait chain" -> end any processes that it's waiting on.
- You should give your computer a static IP (or reserve the one in your DHCP settings so it always gets the same one) and then enter that IP on the screen that asks for IP address
- Open
w32mkset.exefrom theC:\WGSERVfolder and set open files set current to 100, and set handles to 100 (this prevents various BTRIEVE errors. - Add
files=250toc:\windows\system32\config.nt - Reboot.
Disable Modules
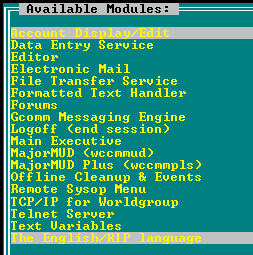
After reboot/install, from the start menu, go into Worldgroup Server -> Offline Utilities -> and then select and run disable or re-enable selected modules.
The only required modules are listed below. Disable all the rest.
General Setup
- Now launch "General Setup" from the utilities folder.
- Go through every item looking for ways to disable shit you don't need. I didn't write everything down that I did (I will next time I do it), but for example, under Core ->
CLISRC: Support Client/Server users-> turn thatoff. Client server is a GUI interface WG made that has no use to us. Another example, underSign-up and account display/edit-> disable all the sign-up questions you don't care about, like "company name." - Don't be lazy. Go through them all and set it up properly.
- Now launch
Security & Accountingand do the same. Go through everything. Stuff you don't want people to do, assign it theSYSOPkey. - Don't be lazy. Go through them all and set it up properly.
- Launch
Hardware Setup-- Under Core ->GROUP1Change the number of channels to 254 (leave one open) - Launch
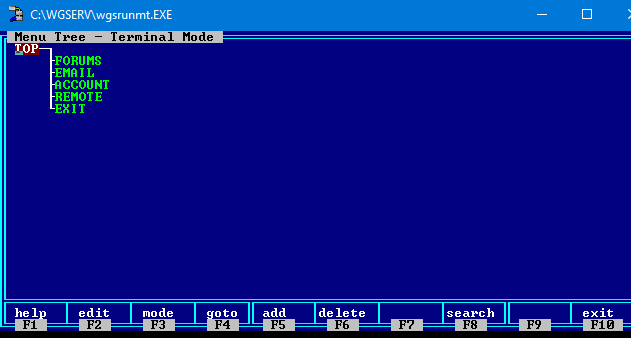
C:\WGSERV\wgsrunmt.EXE-- the menu editor. You're going to get two popups about things being disabled that are in the menu. - First press F3 to change to c/s mode. Since we don't use this delete everything. you can easily do this by going to the bottom of the list and then repeatedly pressing F6 -> Y (for yes) -> enter. Once finished press F3 again.
- Now delete everything except Account, Electronic Mail, Forums, Remote Sysop Menu, and Exit. If you're choosing to leave other stuff enabled then leave it there.
NOTE: Just because you remove the menu item doesn't mean people can't get to it. You need to disable the module for that.
- Press F10 to exit the menu editor.
- Launch WG
C:\WGSERV\wgsappgo.exe, log in and make sure the menu works and you can log out. - Shut it down.
Suspend default "test" user
- Log in as SYSOP
- Type:
/go sysop - Type:
suspend test
Optional: Enable old-style console window
NOTE: Having this enabled seemed to cause weird issues (at least on windows 7 64-bit). Sometimes no input would be allowed (for anyone on the board!) until i pressed something on the console. Other times the system would be laggy for remote users.
- Regedit -> HKEY_LOCAL_MACHINE\SOFTWARE\Wow6432Node\Galacticomm\Worldgroup Server\CurrentVersion -> UseConsoleWindow -> 1
Installing MajorMUD
- Extract the zip for MajorMUD v1.11p to a separate folder - WCCNT8PJ.zip
- Open a command prompt window, navigate to that folder, and run
icomp WCCMMUD.Z c:\WGSERV\ -d -i -oto extract mud to your WG folder - Now change directory to your
WGSERVfolder and runcopy wcc\*.vir wcc\*.dat - Now launch the offline utilities again (Start -> programs -> Worldgroup Server -> Offline Utilities) and you will see it go through a setup. Either press CONTROL+C at the prompt or just press enter a couple times and go through some errors about unzipping files because of 16-bit executables.
- Close the offline utilities.
- The files it tries to extract are:
WCCHSE.ZIP,WCCEMB.ZIP,WCCBAN.ZIP,WCCSTA.ZIPandWCCSTO.ZIP. Go into your WGSERV (C:\WGSERVER) folder and right-click on each of those zip files and extract their contents intoC:\WGSERV(right-click and "extract here" with most programs, like 7zip). - Unzip the GangHouse pack
MajorMUD_HSE_FILES_ODSBBS.zip(download) toC:\WGSERV - Also create two text files. They are displayed when reading signs in newhaven and silvermere town square:
NEWHAVEN.TXTandSILVRMRE.TXT. You can create blank files from DOS if you want by typingecho.>NEWHAVEN.TXT - If you are cracking the mud DLL for edits, do as described here
- Now go into WG's Security & Accounting.
- MajorMUD Plus: Enter activation code, change the credits for changing desc to 0, credits to buy a life: 0 (set to -1 to disable buying lives), copper to buy a life: 0 (change if you want).
- WCCMMUD: Enter activation code, credits per minutes consumed while in game: 0 - Now launch WG's General Setup
- MajorMUD Plus: Require approval and new descriptions:
no - WCCMMUD:
- Number of buffers to save/set:
10 - Character to start yelling:
" - Name of user defined currency:
runic coin - Number of hit point to die:
-100 - Fourth global to disallow:
=set - Fifth global to disallow:
;set - Extra levels before training:
10 - Max topten users/gangs:
100 - Percentage of evil points to keep:
0 - Rate to perform initialization:
1000 - Maximum level difference for pvp: Pick something (5/10/-1)
- Allow sysop lightning on all players:
no - Delete majormud user with bbs user:
yes
- Number of buffers to save/set:
- MajorMUD Plus: Require approval and new descriptions:
- Launch the menu editor
C:\WGSERV\wgsrunmt.EXE- With "TOP" highlighted press F2 for edit
- Arrow down and find a spot to put the MajorMUD menu item, type an
M(or whatever you want) - Short desc:
MajorMUD - Destination page:
MAJORMUD - Save it and then arrow down to return to menu tree and press enter
- Arrow down and highlight
MAJORMUDif not already and pressF2 - Choose module page
- Module name:
MajorMUD - Return to menu tree
F10to Exit
NOTE: With the v1.11p dats that I installed, whenever the board started up and ran through the update file, I'd end up with a "corrupt" (per-say) textblock database. It would add the misc characters to the end of each block. You can strip these with nightmare but some textblocks are close to full and will become broken by this. If you fire up nightmare and build a new update file (full or blank) before launching the board for the first time you will not run into this issue.
- Fire up the board, login, go to the Majormud menu but don't enter the game
- Type
SYSOP Afor Addon module activation codes- Enter
1for Mod 1, and enter the activation code. - Repeat for 2 through 9
- That should do it.
Btrieve Modifications
Optional, but highly recommended: Optimize the btrieve settings (pretty sure this is not necessary if you plan to upgrade to the new pervasive engine, though I suppose it doesn't hurt).
Registry Key Downloads:
btrieve-settings-32bit.reg or btrieve-settings-64bit.reg
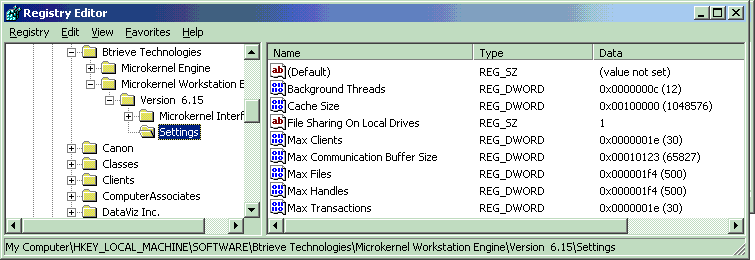
Note: on a 64bit system you will find this under HKEY_LOCAL_MACHINE\Software\WOW6432Node instead of the ones listed below.
Windows Registry Editor Version 5.00

[HKEY_LOCAL_MACHINE\SOFTWARE\Btrieve Technologies]

[HKEY_LOCAL_MACHINE\SOFTWARE\Btrieve Technologies\Microkernel Engine]

[HKEY_LOCAL_MACHINE\SOFTWARE\Btrieve Technologies\Microkernel Engine\Version  6.15]

[HKEY_LOCAL_MACHINE\SOFTWARE\Btrieve Technologies\Microkernel Engine\Version  6.15\Microkernel Interface]

[HKEY_LOCAL_MACHINE\SOFTWARE\Btrieve Technologies\Microkernel Engine\Version  6.15\Microkernel Interface\Settings]
"Target Engine"=dword:00000000

[HKEY_LOCAL_MACHINE\SOFTWARE\Btrieve Technologies\Microkernel Workstation Engine]

[HKEY_LOCAL_MACHINE\SOFTWARE\Btrieve Technologies\Microkernel Workstation Engine\Version  6.15]

[HKEY_LOCAL_MACHINE\SOFTWARE\Btrieve Technologies\Microkernel Workstation Engine\Version  6.15\Microkernel Interface]

[HKEY_LOCAL_MACHINE\SOFTWARE\Btrieve Technologies\Microkernel Workstation Engine\Version  6.15\Microkernel Interface\Settings]
"Load Retries"=dword:00000005
"Local"=dword:00000001
"Requester"=dword:00000001

[HKEY_LOCAL_MACHINE\SOFTWARE\Btrieve Technologies\Microkernel Workstation Engine\Version  6.15\Settings]
"Max Locks"=dword:00000014
"Logging Fmt"="6"
"Compression Buffer Size"=dword:00000400
"Extended Buffer Size"=dword:00004000
"Merge Sort Buffer Size"=dword:00000000
"Max Transactions"=dword:0000001e
"Transaction Durability"="0"
"Disk Wait Limit"=dword:000003e8
"Page Group Size"=dword:0000001e
"Max Clients"=dword:0000001e
"Worker Threads"=dword:00000001
"Background Threads"=dword:0000000c
"Preallocate"="0"
"Minimal States"="1"
"Home Directory"=dword:00000000
"Work Space"=""
"Syserr Notify"="0"
"File Sharing On Local Drives"="1"
"File Sharing On Remote Drives"="1"
"File Sharing Enable Bias"="1"
"File Sharing Max SysTrans Count"=dword:00000001
"Startup Logo"="0"
"Hide Icon"="1"
"Delete Tmp Files"="1"
"Trace File"="C:\WGSERV\MKDEWE.TRA"
"Trace Databuf Len"=dword:00000020
"Trace Keybuf Len"=dword:00000020
"Trace Ops"=hex:
"Max Files"=dword:000001f4
"Max Handles"=dword:000001f4
"Balanced Trees"="0"
"Create 5x Files"="0"
"Logging On"="0"
"Cache Size"=dword:00100000
"Max Communication Buffer Size"=dword:00010123
"Systrans Bundle Limit"=dword:00000064
"Systrans Time Limit"=dword:000003e8
"Trace"="0"
Updating btrieve database engine (optional)
- Launch installer (
PSQL-Server-9.50.077.002-Win32for me ), enter key, complete install - Machine I was installing on did not have java installed (fresh windows) so I got a prompt about installing it. I said yes. May or may not get this prompt if you already do. Also, sometimes there are compatibility issues with JRE versions.
- Run the transactional tests
- Run the relational tests
- Install any hotfixes for PSQL (
PSQLHotFixSetup952.exefor me ) - Verify that you are licensed -- Start -> Pervasive -> Other Utilities -> License Administrator. Verify you have permanent licenses. First time I did this they only went in as trial licenses and then expired in 30 days and my board wouldn't load (btrieve error 161 - license error)
- In
C:\WGSERV, renamewbtrv32.dlltowbtrv32.dll.old - copy the file
C:\PVSW\bin\wbtrv32.dllintoC:\WGSERV - **NOTE: For Nightmare to work you will also need to copy
wbtrv32.dllinto your NMR installation directoryC:\Program Files (x86)\Nightmare Redux - In windows explorer, while browsed to
C:\WGSERV, do a search for\*.dat. Highlight them all and copy them into a backup folder. - Launch
C:\PVSW\\bin\rbldgui.exe - Click "add"
- Browse to
C:\WGSERV - Type
*.datinto the filename field and press enter. screen will refresh with all the .dat's showing. - Click the first one, hold shift, click the last one (highlight them all). click open.
- Click next
- On the config screen don't change anything. I chose to uncheck "continue on errors" though.
- Click next and then finish (hopefully no errors).
- Repeat for
\*.VIRfiles - Repeat for
\*.VIRfiles underC:\WGSERV\GCVIRDAT - Launch WG
- You can verify it's using the new engine by launching Start -> Programs -> Pervasive -> Pervasive.SQL -> Other Utilities -> Monitor
- Options -> Connect
- specify either your machine name or "localhost" in the server field. leave user name and password blank and hit ok.
- MicroKernal -> Active Files will show you all of the open databases (should see all of the opened WG and MUD databases)
- MicroKernal -> Resource Usage will give you stats of open files, handles, number of clients, etc
Install FU Globals
- Extract the zip to a folder - fu-globals-w3.xx.zip
- Copy
ICOMP.exefrom your MajorMUD installation files (or from somewhere else) into the FU Globals folder - Open a command prompt to that folder and run
icomp DATA.Z c:\WGSERV\ -d -i -o - If you updated your btrieve to the new PSQL versions, use the rebuild tool to update the
DIAL*.DATandDIAL*.VIRfiles (see above) - Run the Menu Editor
- Press F2 on
TOPto edit - Put a
Gsomewhere:- Short Description:
FU Globals - Key Required:
SYSOP - No Key:
hide - Destination page:
FUGLOBALS
- Short Description:
- Return to tree, press
F2onFUGLOBALS - Module page, Key required:
SYSOP, Module Name:FU Globals F10to exit- Start Worldgroup
- Get to the menu and press
Gto enterFU Globals - At the prompt to register say yes and enter your code
- At the main FU Globals menu, press
C - Now make the following changes. First Type
Efor edit, and then typecmd <COMMAND>to edit itcmd ;repeat=> change the;repeatto=r(no one likes typing "=repeat" and we change ;repeat to leave =repeat for anyone that has that macro'd)cmd ;#=> change;#to just#cmd =fu=> disable this command to disable the sending of FU gramscmd =tl=> change;tl tosharand=tltosha-- parts 1/3 and 2/3 to disable the share command in mud and avoids an exploit- "
cmd ;ask=> change;asktoshare-- part 3/3 to disable the share command to prevent an exploit. - Do the same for
forg, "forgi,forgiv, andforgiveto prevent another exploit. Assign them to other vars like "rt" (read FU Grams to you),rf(from you),td(time of day) - Additional commands to disable:
set,mail,rpedit,macros1,macros2
- Press X to go back to the main FU G menu and then press M for modules and then G for Go modules
- Enter
MajorMUDon one of the lines to disable the alternateGOcommands in MUD - Back at the main FUG menu, press O for online CNF, and press
1for config screen1 - Change #3) Key needed to be forced invisible at logon to something like
INVISIBLEKEY - On config screen #6 change
Default # of minutes of NO ACTIVITY before AUTO-AFKto0
Install Dialsoft Control v5.62
NOTE: Dialsoft Control v2.01 DOES NOT WORK... at least I couldn't get it to work. With v2.01 anyone that did not have a master key basically has no keyring. I could not find any way to fix this. Works fine in v5.62.
- Extract the zip to a folder
- Copy
ICOMP.exefrom your majormud installation files (or from somewhere else) into the FU Globals folder - Open a command prompt to that folder and run
icomp DATA.Z c:\WGSERV\ -d -i -o - If you updated your btrieve to the new PSQL versions, use the rebuild tool to update the
DIALCTRL.DATandDIALCTRL.VIRfiles (see above) - Run the menu editor
- Press
F2on TOP to edit - Put a
Csomewhere, short description: Dialsoft Control, key required:SYSOP, no key:hide, destination page:CONTROL - Return to tree, press
F2on CONTROL - Module page, Key required:
SYSOP, Module Name:Dialsoft Control F10to exit- Start Worldgroup
- Get to the menu and press
Cto enter Control - Press
Cto create configuration file (not sure if this is necessary or not) - Type
config- Enter registration code
- Key required for sysop access to CONTROL:
SYSOP - Store IP address of user in which account field: Country. ** DO NOT CHOOSE "PhoneNumber" ** -- I chose this and then whenever a new user was created it wouldn't save their choice for their sex, nor it would save their screen columns and rows.
- Type "N" for new user contol
- Clear the name next to
New user mail notification accounts/forums #1 - Punish users who enter first name only? -
NO - Punish users who enter letters in their phone #? -
NO - Send new user email even if user is punished? -
NO - Disable all of the "Punish─new─users─who─use─kill─words" ...
- Punish new users who use kill-numbers in their phone#? -
NO
- Clear the name next to
- Press
Gfor global and set SYSOP for key required for everything there. - Press
MMfor Miscellaneous- Maximum simultaneous connections from an IP: Set if you want to limit this. And you can exclude IPs below that.
- If you would like to add everyone's IP address to a FU globals online list (a SYSOP one would be safer):
- From the WG utilities folder in the start menu, launch the Text Block Editor
- Scroll down to
DIALGLO-> FUL5H (sysop user list #1 header) and clickWGSDRAW - Change
Real NametoIP ADDRESS - Press ALT+X and then choose save
- Now CLICK ON BUT DONT EDIT FUL5L (sysop user list #1 user online and visible) -- whenever I would edit this with WGSDRAW it would insert a "clear screen" escape sequence and there was no way I could figure out to get rid of it (supposed to be able to press ALT+W in wgsdraw but it wouldn't work). And manually editing it out would screw up the whole file.
- Just change the text
FUO\_REALNAMEtoDIA\_IPADDRESSright in the window there. - Click save on the toolbar and then close the text block editor (file does not compile unil you close it)
- Reload the system
Worldgroup Administration
Files
| Filename | Command Line | Description |
|---|---|---|
| C:\WGSERV\wgsappgo.EXE | Start Worldgroup | |
| C:\WGSERV\WGSCNF.exe | Worldgroup Configurator | |
| -L1 | Launch Hardware Setup | |
| -L3 | Launch Security & Auditing | |
| -L4 | Launch General Setup | |
| -L6 | Launch Text Block Editor | |
| C:\WGSERV\WGSUMENU.exe | Offline Utilities | |
| C:\WGSERV\wgsrunmt.EXE | Menu Editor | |
| C:\WGSERV\WGSCLEAN.BAT | This batch file runs during BBS Cleanup (contents below) | |
| C:\WGSERV\non-sga-check.bat | This batch file runs during BBS Cleanup (contents below) | |
| C:\WGSERV\non-sga-check.py | Python script run by non-sga-check.bat (contents below) |
|
| C:\WGSERV\non-sga-check.log | Results of non-sga-check.py runs |
Non-SGA Blocking Script
This Python script processes the wgsaudit.adt audit file to detect unauthorized clients by scanning for IP addresses associated with "NON-SGA CLIENT" entries, then adds any new, unblocked IPs to blocklist.txt. It first loads the blocklist into a set for efficient lookup, then parses the audit file using a regular expression to identify IP addresses. If a new IP is found, it is appended to the blocklist, and the event is logged. The script logs all actions to both a log file and the console, and terminates if the necessary files are missing.
- Install Python - https://www.python.org/downloads/
- Put the following
non-sga-check.batandnon-sga-check.pyfiles in thec:\WGSERVfolder - Create
blocklist.txtin yourc:\WGSERVfolderecho.>c:\WGSERV\blocklist.txt - Open Security and Accounting: TCP/IP Settings -> IP Addresses -> HOSTDENY ->
blocklist.txt - Add
non-sga-check.batto yourWGSCLEAN.BATfile
non-sga-check.bat
(make sure your path to python.exe is correct)
@echo off
SET "BATDIR=%~dp0"
"%LocalAppData%\Programs\Python\Python311\python.exe" "%BATDIR%non-sga-check.py""
non-sga-check.py
import os
import re
import sys
from datetime import datetime

# Constants for file paths (use absolute paths for Windows)
AUDIT_FILE_PATH = r"C:\WGSERV\wgsaudit.adt"
BLOCKLIST_FILE_PATH = r"C:\WGSERV\blocklist.txt"
LOG_FILE_PATH = os.path.join(os.path.dirname(__file__), "non-sga-check.log")

# Function to log messages to the log file
def log_message(message):
    with open(LOG_FILE_PATH, "a") as log_file:
        log_file.write(f"{datetime.now()}: {message}\n")
    print(message)  # Also print to console

# Function to read IPs from blocklist and store in a set for fast lookup
def load_blocked_ips(blocklist_path):
    if not os.path.exists(blocklist_path):
        log_message(f"Error: blocklist file '{blocklist_path}' not found.")
        sys.exit(1)

    with open(blocklist_path, "r") as block_file:
        blocked_ips = {line.strip() for line in block_file if line.strip()}
    log_message(f"Loaded {len(blocked_ips)} blocked IPs.")
    return blocked_ips

# Function to append a new IP to the blocklist
def add_ip_to_blocklist(ip, blocklist_path):
    with open(blocklist_path, "a") as block_file:
        block_file.write(f"{ip}\n")
    log_message(f"{ip} added to block list.")

# Function to find IPs in the audit file and add any new ones to the blocklist
def process_audit_file(audit_file_path, blocked_ips, blocklist_path):
    if not os.path.exists(audit_file_path):
        log_message(f"Error: audit file '{audit_file_path}' not found.")
        sys.exit(1)

    ip_pattern = re.compile(r"\d{1,3}\.\d{1,3}\.\d{1,3}\.\d{1,3}")
    new_ip_count = 0

    with open(audit_file_path, "r") as audit_file:
        for line in audit_file:
            if "NON-SGA CLIENT" in line:
                match = ip_pattern.search(line)
                if match:
                    ip = match.group()
                    if ip not in blocked_ips:
                        add_ip_to_blocklist(ip, blocklist_path)
                        blocked_ips.add(ip)
                        new_ip_count += 1

    log_message(f"Processed audit file. Added {new_ip_count} new IPs to blocklist.")

# Main execution
def main():
    # Load the blocked IPs from the blocklist
    blocked_ips = load_blocked_ips(BLOCKLIST_FILE_PATH)

    # Process the audit file and update blocklist
    process_audit_file(AUDIT_FILE_PATH, blocked_ips, BLOCKLIST_FILE_PATH)

    log_message("Script execution completed.")

if __name__ == "__main__":
    main()
Cleanup / Backup Script
This assumes access to rar, curl, restic, and the non-sga-check.bat/python script(s) above.
This script performs the following actions:
- Sends a notification to Discord at the start of the cleanup process.
- Moves the
WCCMMUD.logandnon-sga-check.logfiles to C:\BACKUPS. - Compresses the entire
C:\WGSERVfolder into a RAR file and saves it inC:\BACKUPS. - Moves the
WCCMMUD.logandnon-sga-check.logfiles back to theC:\WGSERVfolder. - Cleans up local backup files from
C:\BACKUPS. - Backs up the contents of
C:\BACKUPSto a Restic repository in Backblaze B2. - Cleans up the Restic repository.
- Sends a notification to Discord when the cleanup is complete.
- Starts up the BBS.
WGSCLEAN.BAT
@echo off

:: set dicord webhook
SET WEBHOOK_URL=https://discordapp.com/api/webhooks/xxxxxxxxxxxxxxxxxxx/xxxxxxxxxxxxxxxxxxx

:: set folders
SET BACKUP_FOLDER=c:\backup
SET WGSERV_FOLDER=c:\WGSERV

:: set files to exclude from backup
SET EXCLUDE_FILES=wccmmud.log,non-sga-check.log

:: set backup retention
SET LOCAL_KEEP_DAYS=7
SET RESTIC_KEEP_DAYS=7
SET RESTIC_KEEP_WEEKS=8
SET RESTIC_KEEP_MONTH=12

:: define program locations
SET RESTIC_EXE=c:\util\restic_0.12.1_windows_amd64.exe
SET RAR_EXE=C:\PROGRA~1\WinRAR\rar.exe
SET CURL_EXE=%systemroot%\system32\curl.exe

:: set restic repository settings
SET B2_ACCOUNT_ID=xxxxxxxxxxxxxxxxxxx
SET B2_ACCOUNT_KEY=xxxxxxxxxxxxxxxxxxx
SET RESTIC_REPOSITORY=b2:some-bucket:/
SET RESTIC_PASSWORD=xxxxxxxxxxxxxxxxxxx

:: send discord notification
%CURL_EXE% -H "Content-Type: application/json" -d "{\"username\": \"Orfeo\", \"content\":\"BBS shut down. Starting backup.\"}" %WEBHOOK_URL%

:: get todays date in MM-DD-YYYY format
for /f "usebackq skip=1 tokens=1-3" %%g in (`wmic Path Win32_LocalTime Get Day^,Month^,Year ^| findstr /r /v "^$"`) do (
  set _day=00%%g
  set _month=00%%h
  set _year=%%i
  )
set _month=%_month:~-2%
set _day=%_day:~-2%
set PRETTY_DATE=%_month%-%_day%-%_year%

:: run non-sga ip block script
call %WGSERV_FOLDER%\non-sga-check.bat

:: move the files to exclude out of the WGSERV folder
for %%X in (%EXCLUDE_FILES%) do move %WGSERV_FOLDER%\%%X %BACKUP_FOLDER%

:: compress the WGSERV folder
"%RAR_EXE%" a -rr -ag-MM-DD-YYYY %BACKUP_FOLDER%\wgserv.rar %WGSERV_FOLDER%

:: move excluded files back into WGSERV folder
for %%X in (%EXCLUDE_FILES%) do move %BACKUP_FOLDER%\%%X %WGSERV_FOLDER%

:: cleanup old local files
forfiles -p %BACKUP_FOLDER% -m *.* -d -%LOCAL_KEEP_DAYS% -c "cmd  /c del /q @path"

:: upload backup to b2
"%RESTIC_EXE%" unlock
"%RESTIC_EXE%" backup %BACKUP_FOLDER%\wgserv-%PRETTY_DATE%.rar
"%RESTIC_EXE%" forget --keep-daily %RESTIC_KEEP_DAYS% --keep-weekly %RESTIC_KEEP_WEEKS% --keep-monthly %RESTIC_KEEP_MONTH%
"%RESTIC_EXE%" prune

:: send discord notification
%CURL_EXE% -H "Content-Type: application/json" -d "{\"username\": \"Orfeo\", \"content\":\"BBS backup complete. Starting BBS.\"}" %WEBHOOK_URL%
MajorMUD Administration
Hex Edits
If you wish to do editing of your MUD it is highly recommended that you apply the following patches. Use Hex Workshop or equivalent in order to make the following changes.
| Offset | Change From | Change To | Notes |
|---|---|---|---|
| 000019F3 | CO 5D | F4 BF | Increased Monster Records? #1 |
| 0001475B | E8 C67A 0500 | 90 9090 9090 | Increased Class Records |
| 00014777 | E8 907A 0500 | 90 9090 9090 | Increased Map Records |
| 00014814 | 66C7 8473 3A07 0000 0000 | 9090 9090 9090 9090 9090 | Increased Abilities/Spells #1 |
| 000148BE | 66C7 8473 3A07 0000 0000 | 9090 9090 9090 9090 9090 | Increased Abilities/Spells #2 |
| 000149B0 | 66C7 8473 3A07 0000 0000 | 9090 9090 9090 9090 9090 | Increased Abilities/Spells #3 |
| 0001561E | E800 EDFF FF | 9090 9090 90 | Fix for Increased Records |
| 00015794 | 74 | EB | Increased Race Records |
| 00018290 | 0F85 FC02 | E9FD 0200 | MajorMUD Addon Crack #1 |
| 0002F57E | C800 | FF7F | Increased Shop Records #1 |
| 000392D8 | 41 | 4F | "(Two handed)" changes to "(Weapon Hand)" |
| 0004E789 | 53 | 50 | MajorMUD 256-User Crack #1 |
| 0004E79C | 0400 | 0001 | MajorMUD 256-User Crack #2 |
| 0004E9B4 | 75 | EB | MajorMUD Addon Crack #2 |
| 0004E9BA | FF75 08 | 9090 50 | MajorMUD Addon Crack #3 |
| 0005AE3D | E8 0300 | EC FF09 | Increased Shop Records #2 |
| 0005AEBD | E8 0300 | EC FF09 | Increased Shop Records #3 |
| 0005AED5 | E8 0300 | EC FF09 | Increased Shop Records #4 |
| 0005B01D | D0 07 | FF 7F | Increased Shop Records #5 (Restocking) |
| 0005F879 | D0 07 | FF 0F | Increased Monster Records #2 |
| 000649EA | E856 FAFC FF | 9090 9090 90 | SYS LIST NEWLIMITED call |
| 0006D639 | 66 C784 433A 0700 0000 00 | 90 9090 9090 9090 9090 90 | Smash, PerStealth, and Meditate Fixes #1 |
| 0006D6E3 | 66 C784 433A 0700 0000 00 | 90 9090 9090 9090 9090 90 | Smash, PerStealth, and Meditate Fixes #2 |
| 0006D7D5 | 66 C784 433A 0700 0000 00 | 90 9090 9090 9090 9090 90 | Smash, PerStealth, and Meditate Fixes #3 |
| 0007C02F | 64 6973 636F 6E6E 6563 7465 6421 2121 0D | 68 756E 6720 7570 2121 210D 0000 0000 00 | "just disconnected!!!" changes to "just hung up!!!" |
| 0008FD9F | 45 4449 5445 44 | 53 5953 4F50 00 | Changes EDITED to SYSOP |
| 0008BCC5 | 6C 616E 6365 | 77 6172 657A | Changes SYS LANCE to SYS WAREZ}} |
Bugs
Various MajorMUD bugs and possible fixes.
Orfeo Store Bug
Elf bards, with their charm maxed, blessing with beauty, can buy/sell song of battle at Orfeo for a profit. They buy low, sell high because Orfeo's is a 0% markup shop. If an elf bard player makes a macro s/he can buy/sell the song of battle fast enough to make about 8 runic per hour, perhaps more."
- Open the game's dats via Nightmare Redux
- Select: Editors -> Shops
- Search for keyword Orfeo, which will take you to "Orfeo Stuff", which is the name of the shop
- You will notice in the 'markup' column the value is 0%
- On the right above the store items there's a tab titled 'General Info'; click it to open
- Set the markup to your preferred value (I use 285% like Blue Tower shops)
- Save
- Compile full update file
Lyrist's Companion (Bard Cloak) Bug
(Not fixed in 1.11p or 1.00x) "lyrist's companion; casts spell 1055/ "BCNS" (bard cloak no spell)
cast message "3499" (blank) - re-insert the cast message, like the rest of the cloaks have. (2520)
desc message "3498" (blank) - re-insert the desc message, like the rest of the cloaks have. (2531 works nicely.) At this point both are currently left blank. MajorMUD doesn't like being told to execute a command with no commands in it; that's what causes the "The room casts XX!" issue with room spells. Many of the game's room spells are left open ended and are written is a sloppy manner. The messages are inserted backwards and the game is looking for "Textblock 0" when it should be looking for "Textblock XX"; the appropriate text block is set up as a duration, level cap or some other protocol for the spell. poor coding."
This bug will crash your board if left unfixed. Follow the instructions listed, using NMR, and it will actually function like it should. Most Sysops just used FU Globals to block the command "u lyr", this will actually fix it so the cloak can be used. Your bards will love you for it.
Encumberance Bug
This fixed with hexedits above
The only way I know to fix this is by using FU Globals, as described above in the FU Globals setup You block the share command to fix it. Here's a little more information on how it's done, and what exactly it let's you do:
"For the most part, it is more hassle than it is worth to carry around so much coin all the time and even more of a hassle to have to reload it, not to mention, running a stash long enough to pile up that much money in one room. I wouldn't have been able to accumulate a stash that big if I hadn't been scripting on the galleon where others had scripted before me, for over a year, and where several rooms had more than 7 million silver in them. For an elf bard, the number of coins needed to roll enc twice was somewhere between 8 million and 9 million...for the general smasher, it would take even about 1 million coins per 1000 enc to roll enc once. This would be a lower amount for most casters but still would take a lot of time to collect/make and load. Since this is strictly a sharing feature, it ties up a lot of time on 2 characters."
Dual Lever Disconnect
"The green house rubbish room, Khaz disposal chamber bug is a bit trickier but can have nasty consequences. If a player in the green house rubbish room pulls the lever at the same time another player pulls the lever in the Khaz disposal chamber it cause random disconnects of players in the realm. This can play havoc if it occurs during a boss kill, if players are disconnected while in big regen rooms, etc."
I tried looking at the levers in NMR, and everything looks good. I guess this must be some coding error somewhere. The fair way to neuter this would be to block access to the Khaz Disposal chamber, via the map function in NMR. I haven't actually played MMUD in many years, so I'm not sure if the Khaz chamber is the only place to dispose of certain objects? You could block the green house rubbish room, but that makes the green gang house less functional. I don't know if this is still a bug in 1.11p - its pretty hard to time, even if you have two people who know about it.
Codec of Twinks
The codec of twinks is a hidden Sysop option in the WCCMMUD.INI configuration file. With this option enabled you will have access to an additional array of Sysop commands.
To enable this option edit or create the file WCCMMUD.INI in your main BBS folder (C:\WGSERV). Add the line for the codec of twinks as follows then save and restart your BBS.
CODEC_OF_TWINKS=78
Additional Commands
This is the complete list of additional commands that are added by the codec of twinks.
Summon monsters, items or spells to your current location.
SYS SUMMON <monster number>
SYS SUMMON <item>
SYS SUMMON <spell>
Teleport to any map and room in the game.
SYS E <room#> <map#>
List a users Quest Flags (ie. what they have completed).
SYS GOD <character> ABILITIES
Tweak the statistics of everyone simultaneously, or reset all edits to this.
SYS TWEAK and SYS EDIT CLEAR
There are also commands that require you to be located in a certain room in order for them to work, these include the invasions and the alignment and high level spell stuff.
Room #238 Map #1
From this room you can use the following commands. They do not need to be proceeded by SYS, just issue the commands.
EXPME : gives experience points
GOODRING : gives you the good alignment quest ring
NEUTRING : gives you the neutral alignment quest ring
EVILRING : gives you the evil alignment quest ring
GOOD[1-5] / NEUT[1-5] / EVIL[1-5] : gives you complete flags for alignment quests at the level you assign
LEARN SPELL : gives you the spells: Eye of Magnus, Bigheal, Combat Fury, Death Gaze, Glove of Invulnerability, Judgement of Doom, Negate Magic, Sphere of Isolation (must be a caster class in order to get these)
Support Chamber
From the support chamber you can now start monster invasions, which can be summoned at max once per day. Again there is no need to proceed the command with SYS as long as you are in the Support Chamber.
ORC INVASION
RED INVASION
CULT INVASION
GREEN INVASION
DUERGAR INVASION
SARACEN INVASION
WCCMMUD.INI Example
# GENERAL
BLANK_LASTNAME_ALLOWED=1
CODEC_OF_TWINKS=78
EXP_IN_TOPGANG=1
MAXIMUM_BANK_BALANCE=0
UPDATE_SPEED=0
# LOGGING
LOGFILE=WCCMMUD.LOG
LOG_SYSOP_COMMANDS=1
TRACK_LIMITED=1
SYS_LOG_DEATHS=1
# SYSOP COMMANDS
SYS_DISABLE_GANGS=MMUDNOGANG
SYS_ADDLIFE_KEY=MMUDGOD
SYS_ALIGNMENT_KEY=MMUDGOD
SYS_DISBAND_KEY=MMUDGOD
SYS_EDITEVIL_KEY=MMUDGOD
SYS_RESET_ROOMS=MMUDGOD
SYS_RETRAIN_KEY=MMUDGOD
SYS_SPEAK_KEY=MMUDGOD
SYS_TOPTEN_KEY=MMUDGOD
SYS_BUFFERS_KEY=MMUDOP
SYS_CHANGE_KEY=MMUDOP
SYS_CLEARSUICIDE_KEY=MMUDOP
SYS_JAIL_KEY=MMUDOP
SYS_LIGHTNING_KEY=MMUDOP
SYS_LISTLIMIT_KEY=MMUDELITE
SYS_LISTUSER_KEY=MMUDELITE
SYS_REPORT_KEY=MMUDELITE
SYS_STATUS_KEY=MMUDELITE
SYS_USERINFO_KEY=MMUDOP
SYS_GOTO_KEY=MMUD
SYS_MAP_KEY=MMUD
Resetting MajorMUD
If you do not understand the difference between these two options and you just know that you want a complete 'MajorMUD reset' then take a full backup of your system and do Option #2 (Full Reset).
Option #1 (Partial Reset)
If you wish to reset all of the users on your board while maintaining the current map environment, you must follow these steps.
- Note: Only choose this option if you KNOW WHAT YOU ARE DOING and know that you want it reset in this manner.
Copy WCCUSERS.VIR to WCCUSERS.DAT
Copy WCCGANGS.VIR to WCCGANGS.DAT
Copy WCCBANKS.VIR to WCCBANKS.DAT
Refer to appendix A.1 in this document and follow those instructions now if applicable to you (i.e. if you own MajorMUD Plus).
Run the BBS and IMMEDIATELY choose C for Clear all saved evil points on the sysop menu.
- Note: This must be done prior to anyone creating new characters.
Immediately followingC, chooseCPto clear all the saved profile information. - Note: This must also be done prior to anyone creating new characters.
Choose R to re-index the limited items from the sysop menu.
Option #2 (Full Reset)
If you wish to completely reset and start from scratch, follow these steps:
- Before you shutdown your BBS for the last time prior to the reset, choose C for Clear all saved evil points on the MajorMUD sysop menu.
- Immediately following C, choose CP to clear all the saved profile information.
- Shutdown the BBS
- Refer to appendix A.1 in this document and follow those instructions now if applicable to you (i.e. if you own MajorMUD Plus).
- Keep a backup copy of your
WCCADDON.SYSfile if you own any MajorMUD addons - If you created a
WCCMMUD.INIfile, take a backup of this file now - Write down any custom settings you may have done in your CNF options
- Delete all the WCC files from your Worldgroup directory (
DEL WCC*.*)
Note: If you are running any other WCC Products (currently only WCC Line Control is available) please contact Metropolis for information on which files to NOT delete.
Note: If you received a new
WCCDMA.SYSfile (for running on a DMA server) after the latest version was released, make sure you save this file to restore it after re-installing.
- Re-install the latest version of MajorMUD using the appropriate methods and apply any newer patches
- Modify your CNF options as appropriate (refer to what you wrote down in step 7)
- If you took a backup of your
WCCADDON.SYSfile, copy it into your BBS directory now. - If you took a backup of your
WCCMMUD.INIfile, copy it into your BBS directory now. - Run the BBS and IMMEDIATELY choose C for Clear all saved evil points on the sysop menu.
Note: This must be done prior to anyone creating new characters.
- Immediately following C, choose CP to clear all the saved profile information.
Note: This must also be done prior to anyone creating new characters.
- Apply all appropriate database patches
Resetting MajorMUD Plus - Entertainment Edition
If you own MajorMUD Plus - Entertainment Edition and you are resetting your MajorMUD game then you most likely want to reset the MajorMUD plus registries and descriptions.
Do this with the clear plus data option in the MajorMUD offline utilities (refer to the MajorMUD Plus release notes - WCCMMPLS.REL - for more information)
Multiple MUDs
This method converts your currently installed MUD to new call letters (i.e. WCC to WBB) and then allows you to install a second MUD using the standard SETUP.EXE.
If you don't have a currently installed MUD, install it normally and test it out and then come back to this.
Note: Backup your whole
C:\WGSERVdirectory somewhere just in case something goes wrong.
Hex Editing
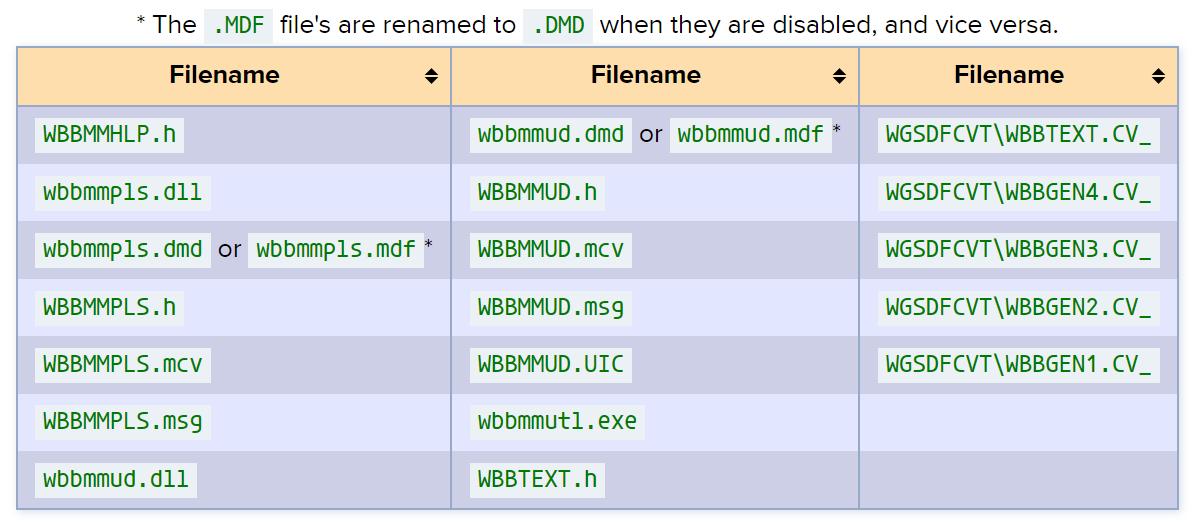
This process needs to be done for the entire list of files to the right one at a time.
- Open the file in the hex editor
- Initiate a "replace" operation (usually Edit --> Replace)
- Make sure that you have "Match Case" enabled/selected.
- Also make sure you're searching for "Text" or "Strings"
- Search for
WCCand replace withWBB(replace All when it asks) - Search for
wccand replace withwbb(replace All when it asks) - Save and Close
Finalizing
- Change the module name.
- Edit the file
WBBMMUD.DMDwith Notepad. - Change Module Name: MajorMUD to something different.
- Example: Module Name: CrazyMUD
- Do the same for the other line below:
- Add-On Utility: WBBMMUTL -- MajorMUD Utilities => Add-On Utility: WBBMMUTL -- CrazyMUD Utilities
- Do the same for
WBBMMPLS.DMD - Note: If you still have MajorMUD as an enabled module you would need to edit the
.MDFfiles as opposed to.DMD.
- Edit the file
- Re-Enable the modules from the Offline Util., they should now show up with your new module name
- Fix/Add the page in the Menu Editor (
WGSRUNMT.EXE), since it will have the wrong module name now. - You may want to go into the Security and Accouting for MajorMUD and MajorMUD Plus and check the key names. Hex editing most likely changed the keys for things like gameop and sysop from
WCCGAMEOPtoWBBGAMEOP. Though, you probably want it this way, and then just add the new keys to whichever classes. - Use NMR to change all the references in the rooms database for
WCCfiles toWBBfiles. this is under tools --> rooms --> change dat call letters (NMR v1.4 required) - Run an Offline Recovery
- Test out the Realm (best to test with your lines closed for the first time).
- Gain some EXP with a character and Exit and Re-Enter the Realm.
- Note: After writing this tutorial Worldgroup did crash on me the first time I gained EXP with a character. After I restarted Worldgroup back up though it was fine from then on.
You can install another instance of MajorMUD by using the setup like it was a fresh install on a BBS without MajorMUD.
Other Options
You may also want to change the name that appears next to things in the Audit Trail.
- Open up
wbbmmud.dllandwbbmmpls.dllin a Hex Editor - Replace all instances of MajorMUD with CustmMUD or w/e you want.
- The only tricky part here is you can't change the length of the text MajorMUD.
- Therefore you must replace the letters letter for letter (aka your custom name must be no longer and no shorter then 8 characters).1
General Editing Help
Backup, Backup, Backup! - Always make backups
download and install winrar to get rar.exe - copy it to your WG folder...
Go to your WG folder and create the following:
- A
WGSCLEAN.BAT file(this bat files runs at cleanup) - A folder under WG called
mudbackup
Create a basic backup script WGSCLEAN.bat:
You can use the more complete script above.
@echo off
rar a -rr -ag-MMM-DD-YY mudbackup\wccbackup.rar wcc*.*

This creates a file that looks like "wccbackup-Feb-22-03.rar"
just remember to delete them every once in a while...

if you had a second realm going, then just add another line:

rar a -rr -ag-MMM-DD-YY mudbackup\wbbbackup.rar wbb*.*
About the Update File
wccupda2.dat - important file
-
When the bbs first starts up, majormud runs through every record that is in the update file and writes the information that's in it to the actual dat files. the update file is important in a normal non-edited mud because it is what restocks shops, helps monster regen, and I'm sure a number of other things.
-
It doesn't update every single field of every record of every database however, just the things that don't have any user interaction. what i mean by this is things like the number of items in a shop, the number of monsters in a room, how many times a monster has dropped an item, etc are not overwritten during this process. when you install mud as an upgrade of a previously installed mud, it doesn't overwrite your .dat files. it only overwrites the mud program files,
wccupda2.dat, and the *.vir files (the .vir files are the base dat files that have never been touched by playing users). if it overwrote your dat files, then all interaction your users had with the game would be lost (not the actually character data, just things like what I've already mentioned). this is why editing environment #1 (below) is the best scenario, read more on that. -
The update file has NOT completely ran through when the audit trail says "majormud initialized." you MUST wait for it to say "Automatic Database Update Complete" to know it's finished. If you edit your realm for say 2x monster exp and load up the bbs and wonder why they are still 1x, it is probably because your update file hasn't completely been run through and/or the monsters that were in the realm before you applied the exp changes weren't taken out during the offiline recovery. This would apply for items, spells, and anything else.
-
About monsters and the active monster file: the way it works is mud pulls a monster from the
wccknms2.dat(the one you edit) and writes them to thewccacms2.dat(active monsters). So if it pulls a monster and puts it into the realm before any editing changes have occured, It will still have the old data. -
After the update file finished its run and you see that "Automatic Database Update Complete" message, it is safe to delete it. If you wish to put an updated (edited) one in it's place. You can then wait for the next shutdown and startup for your edits to be applied or you can go to the sysop menu and "Apply an Update." to tell the update file to run through again.
Note: The databases that are compiled into the wccupda2.dat file are: races, classes, monsters, items, spells, rooms, shops, actions, textblocks, and messages.
Editing Environments
There are three general scenarios you can use to go about with your editing. These are listed in order of recommendation.
-
Copy your w*.dat files to a seperate directory and set nightmare up to edit those. When you are done making edits, compile an update file and copy it to your bbs directory. you'll need to make sure your bbs has finished it's update process (see above) before you can overwrite that file. if you want your dat files to be updated you can either; a) wait for the next shutdown and startup for it to automatically run through, b) go to the sysop menu and "apply an update", or c) restart the BBS manually.
-
Do your edits offline with nightmare setup to edit that dats in your WG folder. This way you don't have to worry about the update file not doing it's job or deal with waiting for edits to be applied. Be sure to compile an update before you load your BBS though. If you don't, all of the edits you did will be overwritten as the update file runs though.
-
Edit the dats in your WG folder while the BBS is running. I have only heard of one user to have success with this and I personally think it can cause a lot of corruption. if mud and you go to write to a record at the same time, OR if mud went to write a value and then you wrote over it before it went to read it again, OR if mud went to read one of the quickreferences it creates for monsters/items/spells/etc and then all of a sudden it isn't there anymore or different than how it initially read it, OR any number of other things I could sit here and write about could cause corruption and/or crashes. use this method cautiously and you'll need to wait until the update file has finished it's course before doing any edits.
Editing Users
DO NOT edit a user while the user is in the game. if you are using method #1 and wish to edit a user, just point NMR to your WG directory temporarily and do whatever edits you want and switch it back.
Any time you manually take the board down to do some edits or whatever you should always run an offline recovery
wccmmutl.exebefore starting the BBS back up.
BTRIEVE ERROR CODES
Status 1 - Invalid Operation
Status 2 - Disk I/O Error
Status 3 - File Not Open
Status 4 - Key Value Not Found, on an UPDATE, this means the file is damaged
Status 5 - Duplicate Key Value
Status 6 - Invalid Key Number
Status 7 - Different Key Number
Status 8 - Invalid Positioning
Status 9 - End-Of-File
Status 10 - Modifiable Index Value Error
Status 11 - Invalid Location
Status 12 - File Not Found
Status 13 - Extended File Error
Status 14 - Pre-Image Open Error
Status 15 - Pre-Image I/O Error
Status 17 - Close Error
Status 18 - Disk Full
Status 19 - Unrecoverable Error
Status 20 - Record Manager Inactive
Status 21 - Index Buffer Too Short
Status 22 - Data Buffer Length
Status 23 - Position Block Length
Status 24 - Page Size Error
Status 25 - Create I/O Error
Status 26 - Number of Keys
Status 27 - Invalid Key Position
Status 28 - Invalid Record Length
Status 29 - Invalid Key Length
Status 30 - Not A Btrieve File
Status 35 - Directory Error
Status 36 - Transaction Error
Status 37 - Transaction Is Active
Status 38 - Transaction Control File I/O Error
Status 39 - End/Abort Transaction Error
Status 40 - Transaction Max Files
Status 41 - Operation Not Allowed
Status 43 - Invalid Record Access
Status 44 - Null Index Path
Status 46 - Access To File Denied
Status 51 - Invalid Owner
Status 52 - Error Writing Cache
Status 54 - Variable Page Error During a Step Direct operation
Status 55 - Autoincrement Error
Status 58 - Compression Buffer Too Short
Status 66 - Maximum Number of Open Databases Exceeded
Status 67 - Rl Could Not Open SQL Data Dictionaries
Status 68 - Rl Cascades Too Deeply
Status 69 - Rl Cascade Error
Status 71 - Rl Definitions Violation
Status 72 - Rl Referenced File Could Not Be Opnend
Status 73 - Rl Definition Out Of Sync
Status 76 - Rl Referenced File Conflict
Status 77 - Wait Error
Status 78 - Deadlock Detected
Status 79 - Programming Error
Status 80 - Conflict
Status 81 - Lock Error
Status 82 - Lost Position
Status 83 - Read Outside Transaction
Status 84 - Record In Use
Status 85 - File In Use
Status 86 - File Table Full
Status 87 - Handle Table Full
Status 88 - Incompatible Mode Error
Status 90 - Redirected Device Table Full
Status 91 - Server Error
Status 92 - Transaction Table Full
Status 93 - Incompatible Lock Type
Status 94 - Permission Error
Status 95 - Session No Longer Valid
Status 96 - Communications Environment Error
Status 97 - Data Message Too Small
Status 98 - Internal Transaction Error
Status 100 - No Cache Buffers Available
Status 101 - No OS Memory Availabl
Status 102 - Not Enough Stack space
Status 1001 - Lock Option Out Of Range
Status 1002 - Memory Allocation Error
Status 1003 - Memory Option Too Small
Status 1004 - Page Size Option Out Of Range
Status 1005 - Invalid Pre-Image Drive Option
Status 1007 - Files Option Out of Range
Status 1008 - Invalid Initialization Option
Status 1009 - Invalid Transaction File Open
Status 1011 - Compression Buffer Out Of Range
Status 1013 - Task Table Full
Status 1014 - Stop Warning
Status 1015 - Invalid Pointer
Status 1016 - Already Initialized
Status 2001 - Insufficient Memory
Status 2003 - No Local Access Allowed
Status 2006 - No Available SPX Connection
Status 2007 - Invalid Parameter
Credits
Syntax53 - https://mudinfo.net
Kyau - https://kyau.net/wiki/Category:MajorMUD